

I missed last weeks Monday Made It because of a last minute end of the summer vacation we took to Michigan. I'm super excited to be home and to have survived the first 3 days of school down here in North Alabama. Last week was slightly crazy, but very exciting too. For some odd reason I decided that our living room walls needed a make over (they've needed a make over since we moved in - last Thanksgiving buttttt I just didn't get around to doing anything about it until this week!). I'm excited to share what I've created in this weeks link up hosted by by Tara from 4th Grade Frolics.

A few months ago I purchased a 16 x 20 canvas collage to hang in our living room. I love how it looks, but even on sale I paid around $30 for it. I wanted some more canvases to put up behind our couch so I decided to make some!

I found 8" x 10" stretched canvases at Walmart on sale ( around $3.66 for a pack of 2). I then printed out some 8" x 10" pictures at Walgreens (make sure to Google "walgreens photo coupons" before purchasing prints - they always seems to have great coupons!) I paid around $11 for a couple of 8" x 10" prints (I had a 50% off coupon). I also used mod podge (which I had already) and black acrylic paint.


To begin, I painted the outside edges of each canvas with black acrylic paint. Trust me - the black makes the canvases look better! Once the paint was dry, I applied a layer of mod podge to a canvas. By apply, I took a paint brush and brushed it all over the canvas. Immediately after putting mod podge on the canvas I centered my 8" x 10" print to the canvas. Then, I applied a layer of mod podge over the print.
I was really nervous to apply the mod podge to the top of the print, but trust me, it dries clear!! Make sure to spread out any clumps though!
Once the layer of mod podge dried, I painted another layer of black paint around the edge of the canvas AND around the edge of the print (without painting the edge of the print, you may be able to see a white edge). Once that layer of paint dried I applied one last layer of mod podge over the ENTIRE canvas (top and sides) and allowed it to dry.
I am so happy with how they turned out!
*Tip: picmonkey.com is an online photo editor. The basic version is free. You can use it to darken the edges of your pictures before sending them to the printer - the dark edges look nice with the black paint I painted the outer edges with.
Since we moved into our house our living room wall has a 16"x 20" photo collage, and a letter L that I had wrapped in twine and hung on the door of our previous house. The letter is old and ragged and blended into the wall -- it really made the wall look bland, see:

YUCK! Before the glue turned yellow it looked nice against our red front door, but on the wall it just looks icky.
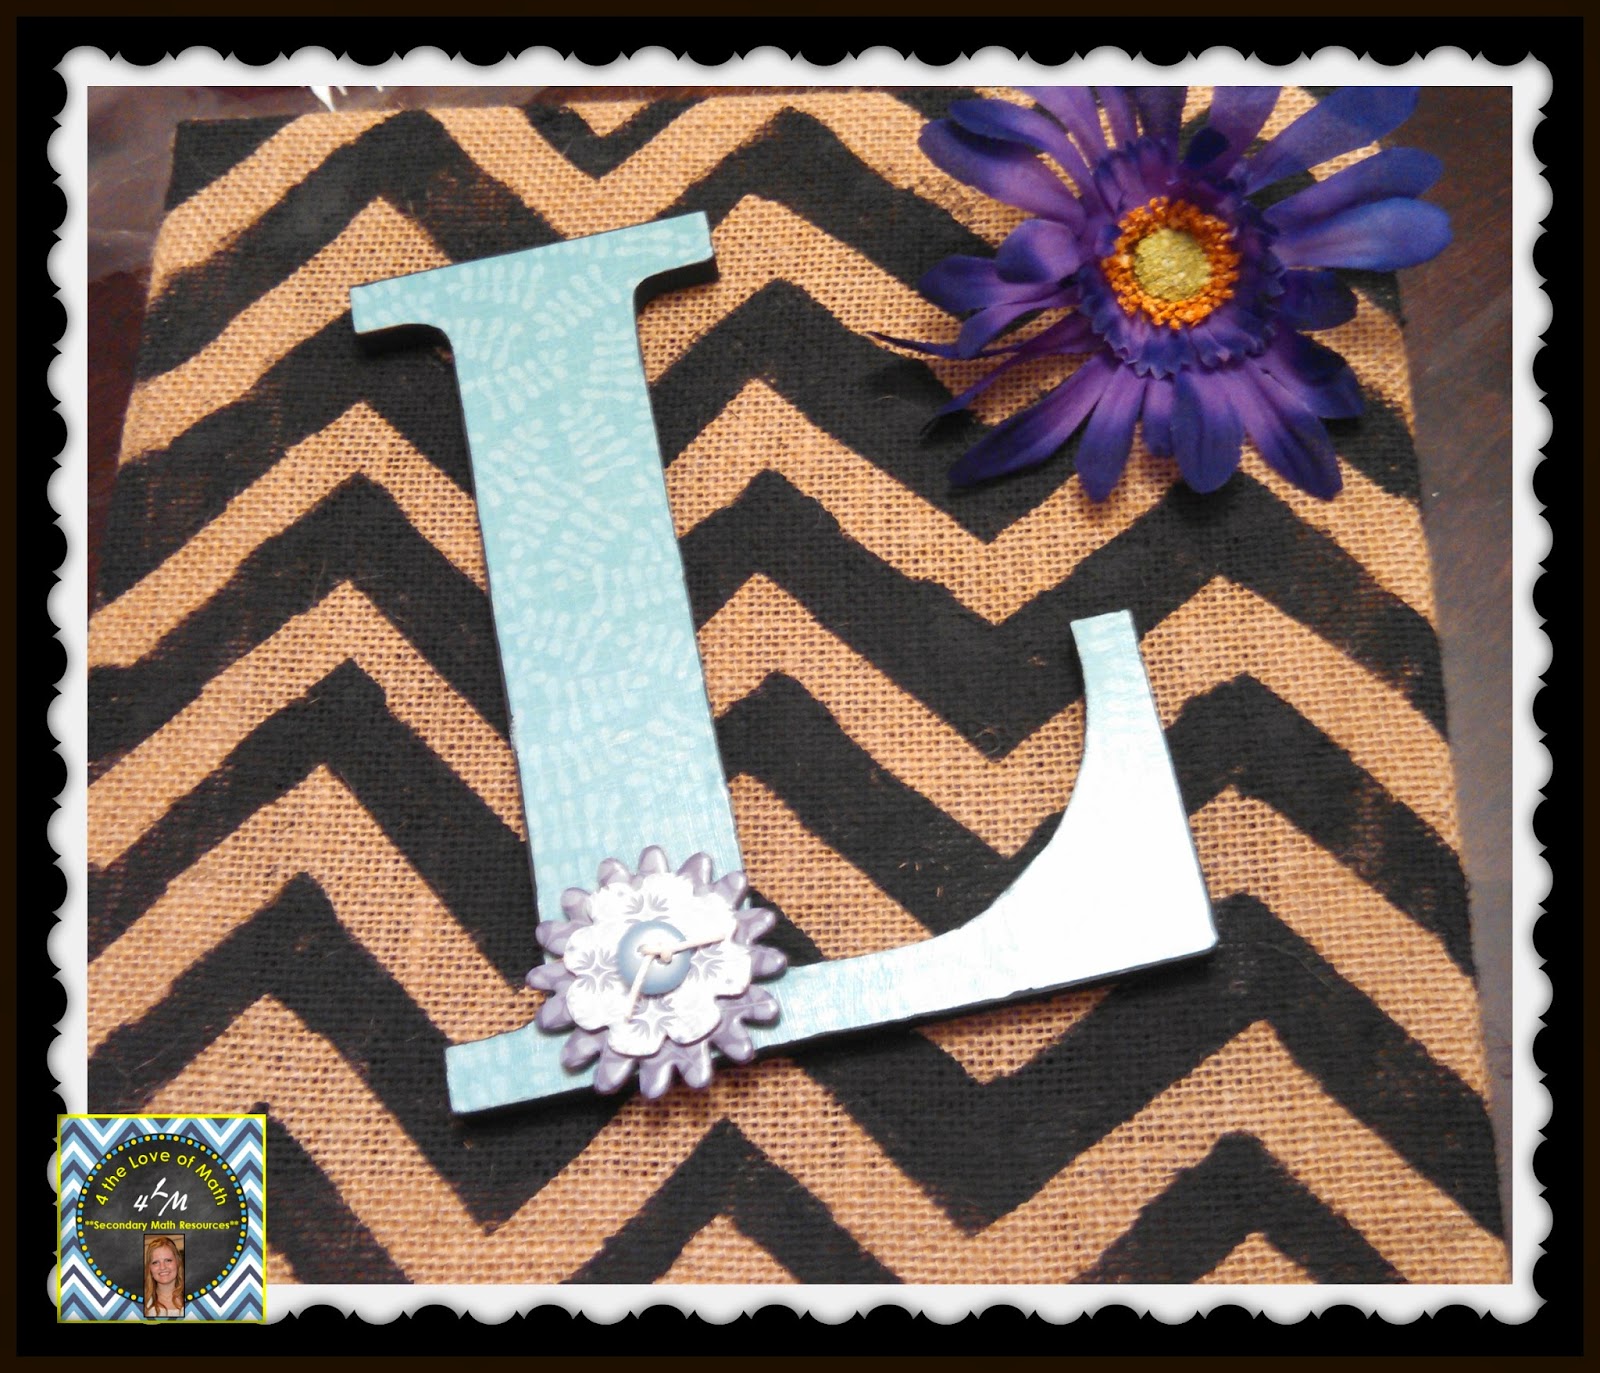
I like the concept of having an L but I knew I needed a different way to display it. I purchased a 12" x 12" burlap canvas (from Walmart again -- it's the only place that sells craft supplies with a 50min drive!). I also purchased a wooden L. My first step was to paint the burlap. If you use Pinterest you have probably noticed all of the tutorials claiming they will show you an easy way to paint a chevron pattern on a canvas. I checked out quite a few of the canvases and was positive I could duplicate a chevron pattern on my burlap canvas. I figured "hey I have a bachelors degree in math - I can do this!"
I did do it, but oh my gosh - it was tough!! In the end I used a lot of electrical tape, and a cardboard chevron cut out. I taped off the top part of the chevron pattern, and held the cardboard along the bottom edge of where I wanted to paint. Once I had one strip completed I put electrical tape along the bottom edge of the previous strip, then positioned the cardboard approx. an inch below the tape, and painted between the two.

It's definitely not perfect, but I'm ok with that - it's home made! Next, I cut some green patterned scrapbook paper to fit on the wooden L I purchased. I placed mod podge on the L, pressed the scrapbook paper on it (and smoothed the paper out!), then mod podged over the top of the letter. Like the canvases, I painted the outside edges of the L a dark color. I think it makes the L stand out more!

Finally, I pulled out some scrapbook stickers I purchased from Hobby Lobby years ago and forgot about, stuck a sticker to the L, then hot glued it to the canvas.
Here is how it looks now (much better than the old L!)

I'm debating rather or not to add a fake flower to the top corner. I like the way it looks now, but I also like the idea of adding color to the bland walls. What do you think? Leave it as is, or add a flower? Here's what the flower choices are:


The only other thing I did this week - besides creating things for the living room - is update the products I have posted on teachers pay teachers. It's amazing how things I thought were great 2yrs ago now look dull and boring. One of the things I updated were my Solving Two Step Equation Task Cards. This was the old look:

This is the new look:


I definitely prefer the new look! Using unique fonts really helps make school work look more interesting. My favorite font creator is Kimberly Geswein,. Her store can be found here: Kimberly Geswein Fonts. Her fonts are FREE for personal use! That means you can download them and use them to create items for your students! Commercial use licenses are $5 each (which is a real bargain!) so make sure you purchase a license if you plan to sell your creation.
I definitely prefer the new look! Using unique fonts really helps make school work look more interesting. My favorite font creator is Kimberly Geswein,. Her store can be found here: Kimberly Geswein Fonts. Her fonts are FREE for personal use! That means you can download them and use them to create items for your students! Commercial use licenses are $5 each (which is a real bargain!) so make sure you purchase a license if you plan to sell your creation.
__________________________________________________________________
For all of my teacher friends out there make sure to stop by Teachers Pay Teachers Wednesday August 20th a for a special one day "Back to School Boost" sale! My store will be 20% off (as will many other stores on the site). Use promo code "Boost" for up to 28% off throughout the site!
I hope everyone has a great week! I can not wait to see what other people have linked up on the Monday Made It linky party this week!


Love the idea for the photo canvas! Has some great gift potential!
ReplyDeleteTara
The Math Maniac
I like your L - good job with the chevron... I've tried to paint chevron on the side of a box, and it didn't turn out half as well. I like it without either flower in the corner.
ReplyDeleteMichelle
Thank you!! I think I am going to leave it without the flower :)
Delete